Vue3 官方文档
介绍
- vue3 支持 vue2 绝大部分的内容
- 部分接口移除(过滤器、$children、$on、$off)
- 响应式数据原理变了(vue2 数据劫持、vue3 是 Proxy)
- vue3 使用 ts 重构
- 虚拟 DOM 重构
- template 支持多标签
- 新增 CompositionAPI(组合式API)语法
创建项目
方法1 - vue/cli
bash
vue create 项目名方法2 - 本地构建
bash
npm init vue@latest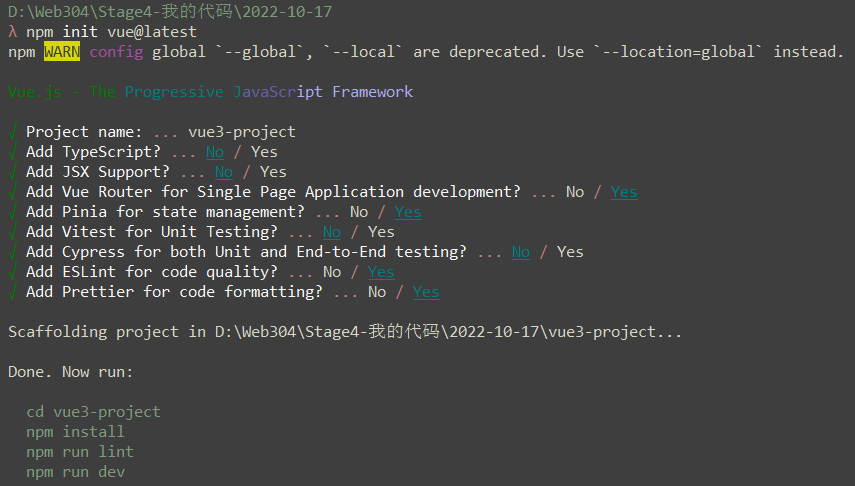
方法3 - vite
bash
# 查看npm版本
npm -v

npm create vite@latest
// 没有模板,需要手动去构建

# npm 6.x
npm init vite@latest my-vue-app --template vue
# npm 7+, 需要额外的双横线
npm init vite@latest my-vue-app -- --template vue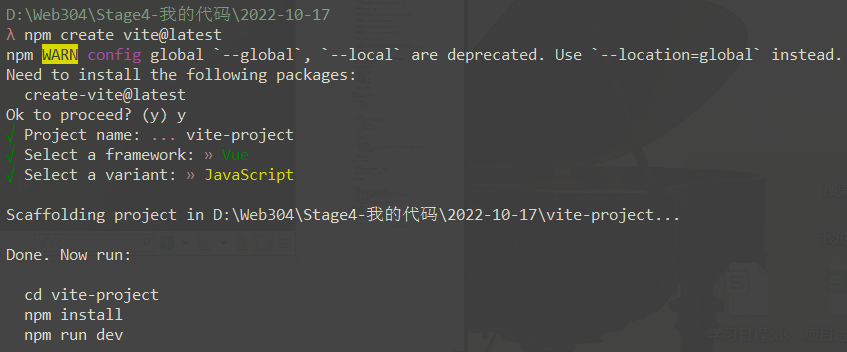
vue 实例化
js
// vue2.x
new Vue()

// vue3.x
import { createApp } from 'vue'
const app1 = createApp({
 data() {},
 methods: {},
 computed: {}
});

// 可以允许创建多个实例
const app2 = createApp({
  /* 根组件选项 */
})

// app 挂载的方法
app2
  .mount()
  .use()
  .component()  // 全局组件
  .directive()  // 全局指令

// 例子
const app = createApp()  // 实例
app.mount('#app')  // 挂载
app.use(router)  // 挂载路由
app.use(store) // 挂载store全局配置
js
const app = createApp();

app.config = {

}

// vue2
// Vue.prototype.$axios = axios

// vue3 全局方法挂载
app.config.globalProperties.$axios = axios;setup
是 vue3 中 composition API 的统一入口,也可以看作是一个生命周期(在 beforeCreate 之前执行的)。
js
// 选项式 API - vue3 依然支持
export default {
  name: '',
  data() {
    return {}
  },
  created() {},
  computed() {},
  watch: {},
  methods: {}
}

// 组合式API(CompositionAPI)
export default {
  setup() {

  }
}

// 或者
<script setup></script>1、vue3.0
js
export default {
  name: "App",
  data() {
    return {};
  },
  setup() {
    console.log("setup");
  },
};这种写法 setup 需要返回数据才能直接在模板中使用
js
export default {
  name: "App",
  setup() {
    const num = ref(0);
    const add = () => {
      num.value += 1;
    };

    return {
      num,
      add,
    };
  },
};2、vue3.2及以后 - setup 语法糖
html
<script setup>
  const num = ref(0);
  const add = () => {
    num.value += 1;
  };
</script>3、getCurrentInstance
返回当前组件实例。
js
<script setup>
import { getCurrentInstance } from "vue";

const instance = getCurrentInstance();
console.log(instance);
</script>defineProps / defineEmits
1、组件props
vue
<template>
  <div>
    <p>Hello {{ title }}</p>
  </div>
</template>

<script setup>
const props = defineProps({
  title: {
    type: String,
    default: "Vue3",
  },
});
console.log(props);
</script>2、触发事件
vue
// 子组件
<template>
    <button @click="onHandler">事件</button>
</template>

<script setup>
const emit = defineEmits(["sendMsg"]);

const onHandler = () => {
  emit("sendMsg", "子组件数据");
};
</script>

// 父组件
<template>
  <HelloVue3 @sendMsg="foo" />
</template>

<script setup>
import HelloVue3 from "@/components/HelloVue3.vue";

const foo = (val) => {
  console.log(val);
};
</script>ref / reactive
1、ref
ref 用于创建响应式数据,一般用于基本数据(引用数据也是可以的)。在 JS 中通过 .value 的形式访问或者修改,模板中直接使用的。
vue
<script setup>
import { ref } from "vue";
const count = ref(0);

const add = () => {
  count.value++;
};
const red = () => {
  count.value--;
};
</script>

<template>
  <main>
    主页

    <div>
      <button @click="red">-</button>
      <button>{{ count }}</button>
      <button @click="add">+</button>
    </div>

  </main>
</template>2、reactive
用于创建引用类型的数据,不能对其进行解构,否则会失去响应式。
vue
<template>
  <div>
    <p>当前页码:{{ state.currentPage }}</p>
    <p><button @click="changePage">修改页码</button></p>
  </div>
</template>

<script setup lang="ts">
import { reactive, toRefs } from "vue";

const state = reactive({
  currentPage: 1,
});

const changePage = () => {
  state.currentPage += 1;
};
</script>

<!-- reactive 解构之后使用,需要利用 toRefs 函数 -->
<template>
  <div>
    <p>当前页码:{{ currentPage }}</p>
    <p><button @click="changePage">修改页码</button></p>
  </div>
</template>

<script setup lang="ts">
import { reactive, toRefs } from "vue";

const state = reactive({
  currentPage: 1,
});
let { currentPage } = toRefs(state);  // toRefs 将响应式对象转为普通对象,就可以进行解构

const changePage = () => {
  currentPage.value += 1;
};
</script>注意:因为 reactive 返回的是响应式数据,不能直接覆盖。
js
// 解决方案1
let list = reactive<Array<string>>([]);
const mockData = ["e", "f", "g"];
list.splice(0, list.length, ...mockData);

// 解决方案2
let list = reactive({
  arr: []
});
list.arr = []

// 解决方案3
const list = ref([])
list.value = [];生命周期
vue2中的生命周期依然可以使用,但是不能放在 script setup 中。
vue3 新增加了一些生命周期函数,必须按需导入后,在 setup 中使用。
vue
<script setup>
import { onMounted } from 'vue';

// 由于生命周期为函数,所以可以重复调用,执行顺序按照书写顺序
onMounted(() => {
  console.log(`the component is now mounted.`)
})
onMounted(() => {
  // ...
})
</script>computed
在 setup 中使用计算属性,需要导入 computed 。
js
import { ref, computed } from "vue";

const num = ref(0);
const formateNum = computed(() => num.value.toFixed(2));watch
在 setup 中需要检测数据的改变,需要导入 watch 。
1、检测 ref 数据
js
import { ref, watch } from "vue";

const num = ref(0);
const add = () => {
  console.log(num);
  num.value++;
};

watch(num, (newVal, oldVal) => {
  console.log(newVal, oldVal);
});2、检测 reactive 数据
js
import { reactive, watch } from "vue";

const state = reactive({
  currentPage: 1,
});

watch(
  () => state.currentPage,
  (newVal, oldVal) => {
    console.log(newVal, oldVal);
  }
);3、深度检测
js
const state = reactive({ count: 0 })
watch(
  () => state,
  (newValue, oldValue) => {
    // newValue === oldValue
  },
  { deep: true }
)4、watchEffect
是 watch 的升级版本,立即执行传入的函数,并追踪依赖变化。
js
watchEffect(() => console.log(count.value))